Saturday, November 9, 2013

A Roll Tide Burlap Christmas Wreath


In my attempt to make TWO of the exact same wreaths (because I have double doors) I wanted the project to be
 1) easier than making a deco-mesh wreath 
2) affordable since I need two of them.


I started with:
1) flat wood wreath frame
2) some pipe cleaners
3) and the burlap


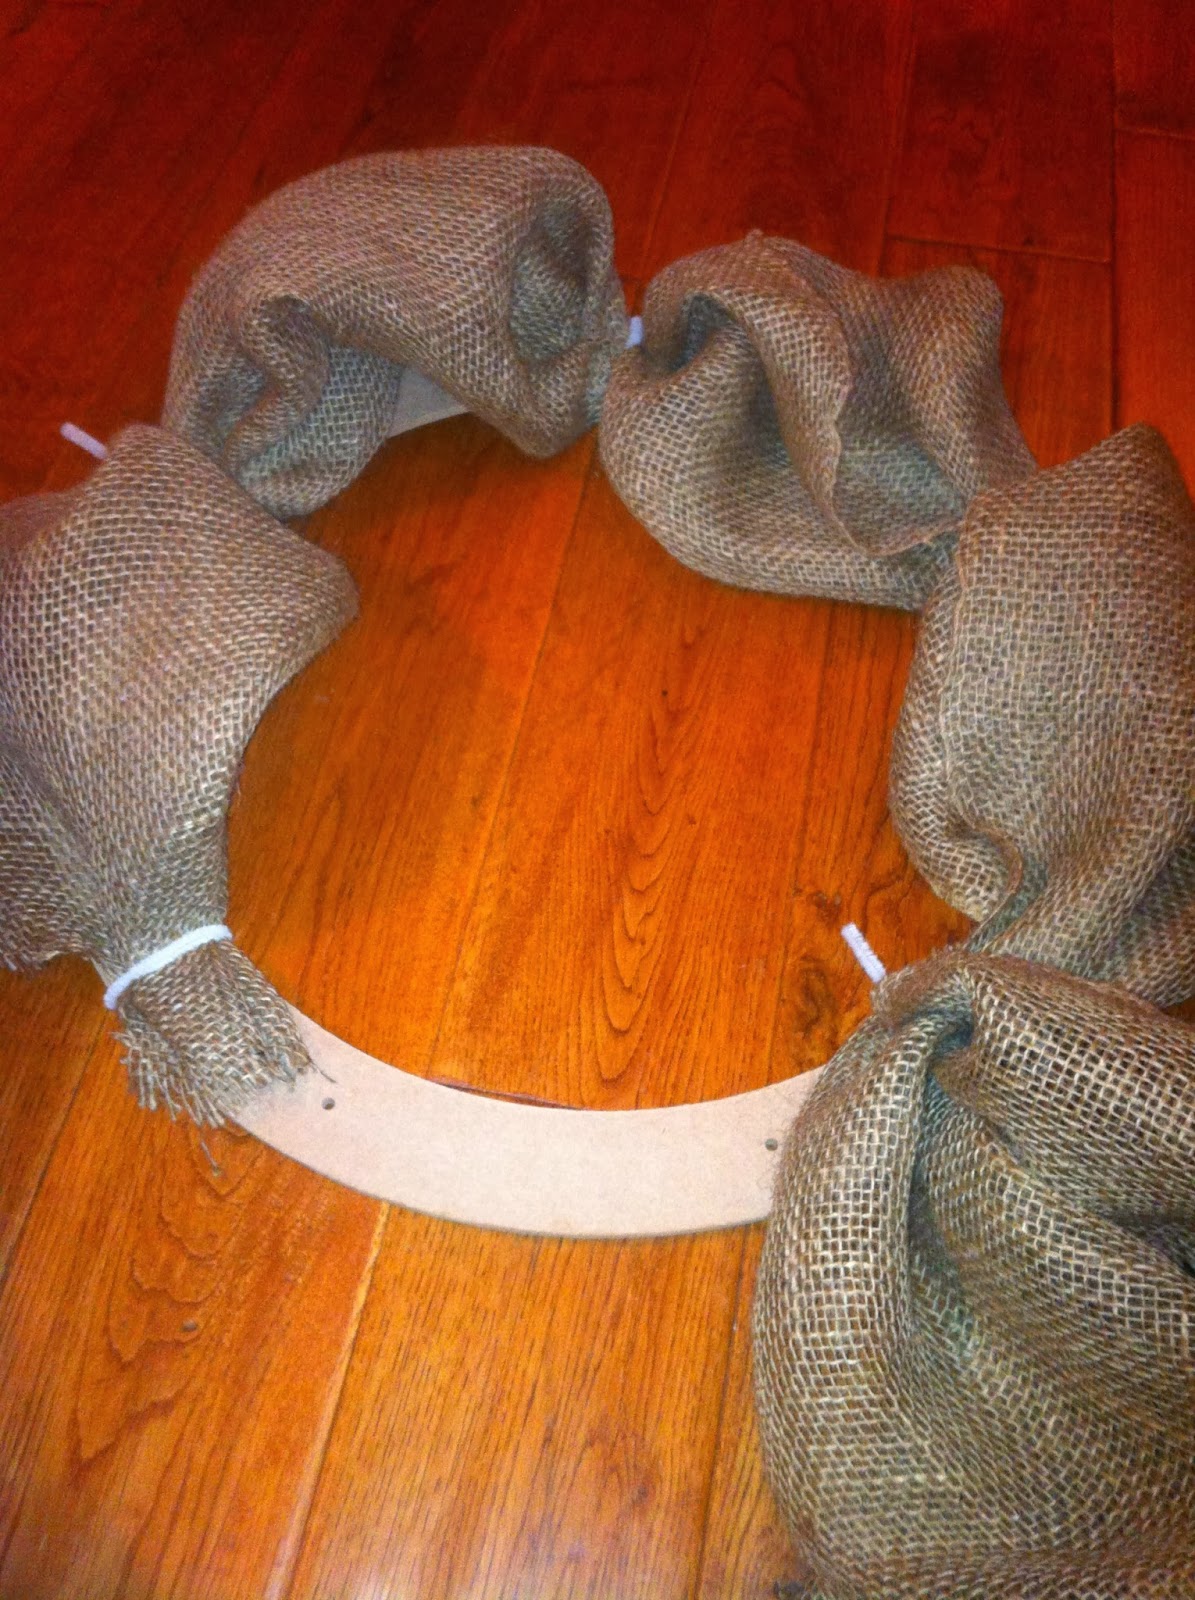
 Start by attaching one end of the burlap to your wreath frame with a pipe cleaner

 The picture on the left shows a view from the back once you've finished securing the burlap all the way around the wreath frame.--- Notice I tried to keep everything as evenly spaced as possible.


The picture to the right is a view from the front as I'm finishing up.---Again, notice how I tried to keep everything even.. the length of the burlap is the same for each "poof" that you see and all of the "poofs" are tied down with pipe cleaners the same length apart.


This is a finished view from the front…... along with a snapshot of my toes on the left for more amusement….


 Decide on the embellishments you want to add to your wreath.  I decided on this ensemble with some red, white and a bit of greenery.


I used a pipe cleaner and some hot glue to attach everything into one piece.


I added some houndstooth burlap bows… and there you have it!…. I call this my Roll Tide Burlap Christmas Wreath!


Notice each of my embellishments are attached to the areas of the wreath where there were pipe cleaners visible…. if you don't want to have to worry about covering over your pipe cleaners use a pipe cleaner that matches the color you are working with.


Friday, November 8, 2013

Deco-Mesh Wreath

Ahhh… more deco-mesh, It seems everyone these days is looking for a deco-mesh wreath or at least a tutorial on how to make one!  As I made this wreath I kept my blog in mind and decided to take plenty of pics so I could give a tutorial on how I made it!


I started with my basic supplies.  A wire wreath frame, some pipe cleaners and the red deco-mesh


Start by unrolling the deco-mesh.  The important thing to know here is that is that whatever LENGTH you unroll it to you will want to keep the SAME LENGTH from this point forward.


Here, I unrolled to the length I wanted and gathered the end of the deco-mesh.  Use a pipe cleaner (or floral wire)… or whatever you have, to secure the deco-mesh to the wire wreath frame.


I used the white pipe cleaners to secure the deco-mesh to the wreath frame so it would be easy to see how the process works for the purposes of this blog….. hopefully, it's helpful!


Unroll the same amount of deco-mesh as before.  Keep in mind… the more you unroll, the LARGER your "poof" will be… so, if you are looking for a smaller size wreath, start by unrolling a smaller length….

For this wreath, I opted for a "medium sized" wreath that would look "full."  You can tell from the picture to the left that the amount of deco-mesh I unrolled was practically the same as the length from the bottom of the wire frame to the top of the wire frame.

For this wreath, I used the wire wreath frame as a
"measurement guide" to measure a consistent length of deco-mesh for each "poof."


In this picture, I'm half-way finished!  You can see I'm tying the 'evenly measured' deco-mesh lengths onto the wreath frame in equal distances!

Because I prefer a "full" and "poofy" looking wreath, I am making the distance between each tied down piece of deco-mesh fairly close together.  


I am tying my deco-mesh down three times in between each section of the wire wreath frame.


And I'm using a pair of wire cutters to cut off the excess length of pipe cleaners! …. you do NOT have to do this… especially if you are using a pipe cleaner that matches the color of your wreath.  However, because I planned to blog about this wreath… I opted for these contrasting colors on purpose!!


View from the front!  I'm halfway through!!


I continued this technique all the way around the wire wreath frame.  Using wire cutters, I cut off all of the excess pipe cleaners… however, if you use a color that matches your wreath you don't even have to use a wire cutter to cut the ends of the pipe cleaners off.


A view from the front of the wreath… err.. ignore the junk in the background!


I added some white deco mesh to the center of the wreath using the same technique described above.  Also, you can see from the pic that its definitely NOT perfect!!


Once you have all the deco-mesh you want on your wreath frame….. decide on which embellishments you want to add.  Because I'm trying to make an Alabama "Roll Tide"/Christmas wreath I chose something that matched both…. and this is what I came up with…..


You can see from the picture to the left I added a hounds-tooth bow, along with some white poinsettia flowers along with one red flower that I positioned across the middle of the white deco-mesh.

Of course you could alternate colors and accessories to match whatever colors you are looking for in your wreath.


This is a picture from a distance…. you can see the white flowers, my houndstooth bow and the red flower across the center of the white deco-mesh.


This is a picture of the houndstooth bow up close…. I found some burlap ribbon with the houndstooth look and couldn't resist grabbing a few rolls!!

I used some hot-glue and a pipe cleaner to shape the bow and make it look like this in order to place it on the wreath.


This picture shows the white poinsettia flower up close so you can see what it looks like with the deco-mesh up close.


and here's the final picture from a distance!!  I think it turned out better than I expected!


It's a Merry Christmas "Roll Tide" wreath!!


Monday, November 4, 2013

Cookie Sheet Serving Tray


On occasion I find myself in need of a serving tray.  Something that's durable and decorative.  This is when I settled on the idea of using a spare cookie sheet as a serving tray.


I started by painting the cookie sheet with white acrylic paint.  I applied two coats.  Once the paint was thoroughly dried I used a clear glaze (which comes in a spray paint can) and "glazed" the entire cookie sheet.

Glazing will help prevent the paint from scratching off and gives it a nice 'shine.'


Once everything had dried.... I rummaged through my scrapbook paper to find something that would work with a serving tray.... and I found a subtle print that worked well with a white background.

I cut the paper to the dimensions I preferred and then mod-podged to the cookie sheet.  Also, I ended up using one of those "mod-podge recipes" which worked pretty well for this craft.

I used half-glue and half-water but during the application I found myself using more glue.


If you notice your paper begin to show "ripples" like the ones in the picture to the left... take your fingers and smooth them out (uh, my nails don't usually look that bad!)...

Carefully smooth out all the ripples so you have a nice flat piece of paper on your cookie sheet.


Once the paper was thoroughly dried I opted for a piece of burlap which I hot glued onto the cookie shirt first and then mod-podged over to prevent the burlap from 'shedding' since I plan to use it as a serving tray.

Again, I just used burlap because it's what I had.  Although I think next time I'll rummage through my ribbons and see what I manage to find.

Note:  I have found it is very difficult to mod-podge wire rimmed ribbons.... the wire portion of the ribbon just isn't easy to mod-podge so if you opt for a ribbon you might want to make sure it isn't wire rimmed or if it is, maybe consider using hot glue.


And now it's ready to use!

Sunday, November 3, 2013

Turkey Chili


Chili is one of my favorite Fall/Winter dishes to cook.  It's warm, filling and when I use ground turkey it's actually pretty healthy as well!


 Ingredients:

1lb. of ground turkey
2 cans of dark red kidney beans
2 cans of diced tomatoes
1 can of chili beans
1 packet of chili seasoning


Cook the ground turkey until done then add the remaining ingredients and allow it to simmer or either place it in the slow cooker until you are ready to serve.


Yum!

Twine Wrapped Pringles Can


I love the idea of up-cycling... taking something you would ordinarily just trash and turning it into something decorative and useful.  Well, for this craft... it was a Pringles can.  I've seen a lot of tutorials about how the Pringles can is the perfect size to hold your spaghetti... So that's what I decided I would do with it!


 Start by hot glueing the first layer of twine around the can.  Continue wrapping the twine around the Pringles can and hot glueing "here and there."


You do NOT have to got glue ALL of the twine. Just use a little hot glue with every other row or so or if you notice the twine is starting to "slip out of place."


Half-way there!  You can see the twine wraps nicely around the can and although it might look like I have hot glued all of it I didn't.  In the picture here the twine is only hot glued about every two to three rows except for the bottom where I used a little more hot glue to get started.
Almost Done!


I decided to add a few Fall leaves since twine reminds me so much of the Fall.  Now it serves as a nice Fall decoration and holds pasta.


Tuesday, October 29, 2013

Hamburger Steak with Noodles


Every once in a while you come home from work and began looking for that super easy yet tasty recipe that everyone in the family seems to like.... well, if that's the case then you gotta give this one a try!  I started with a pound of ground meat (I used turkey) but you could easily use beef.

Ingredients:

1 lb. of ground meat
1/2 cup of French Onion Soup 
1/2 cup of bread crumbs
1 egg

Mix the ingredients together and shape into patties.  Cook over medium/high heat.  Once done, remove the hamburger patties from the heat and add the remaining French Onion Soup along with 1Tbsp of flour.  Stir the mixture together and allow it to cook.  Once the mixture thickens to resemble gravy return the hamburger patties to the heat and reduce to low heat.

Cook noodles (according to package instructions) as many as you prefer to go with your number of hamburger steaks.  Serve the hamburger steaks over the egg noodles once everything is finished.


Thursday, October 24, 2013

Catfish Fillets with Homemade Tartar Sauce & Mashed Potatoes


Nothing seems to satisfy your appetite like a delicious piece of southern fried catfish unless of course it comes with homemade tartar sauce and some southern style mashed potatoes.

Since I'm not a big fan of spending hours in the kitchen to get a good southern-style meal I made it as easy as possible on myself.


This picture and the one below shows the size and color of the (cooked) catfish fillets really well.


Also, I tend to like my mashed potatoes somewhat "thicker" and the pictures show the "thickness" of the mashed potatoes really well.


I used a paper plate (so there were fewer dirty dishes) and seasoned the fish with season salt and some pepper then breaded it with a standard 'seafood' breading.

Also, I used a paper towel to pat my fillets dry.  You can tell from the picture to the left they've been dried off a bit.


I used a pair of tongs to flip the fillet around in the batter and get a good coating.


Make CERTAIN your grease has reached the frying point before beginning to cook your fish.  Otherwise, your batter may come off and your fish could be greasy.


After battering the fillets fry them in about a 1/4 inch of vegetable grease.  You only need enough to cover the bottom of the skillet really well.


Once you notice the bottom edges are a golden brown (or as brown as you prefer) it's time to flip the fillets and continue cooking on the other side.


Cook for 3-4 minutes on the opposite side keeping a check on the bottom until they are a golden brown color.


Now it's time for the Homemade Tartar Sauce:


You will need equal parts of mayonnaise and sweet relish.  If you prefer a "chunky" tartar sauce you can use more sweet relish than mayo.  If you like a tart/tangy taste to your tartar sauce use a 1/2 tablespoon of lemon juice for every cup.


And for my potatoes, I used red potatoes (not peeled) and boiled till done.  Mash with a potato masher (or mix with a mixer) and salt and pepper to taste.  Add milk and butter to make your potatoes as creamy as you prefer.  When I'm eating mashed potatoes with seafood I like to add about 2 Tbsp. of Horseradish.  It gives the potatoes a nice "kick" and adds a punch of flavor that I especially enjoy with seafood.